
Placing one plant
- Find the plant in the Plants list and tap it to open its details.
- Pick a Variety and Color if it has them (e.g. Cherokee Purple tomato).
- Tap Place in garden (or the plant's picture and name), then tap a bed.
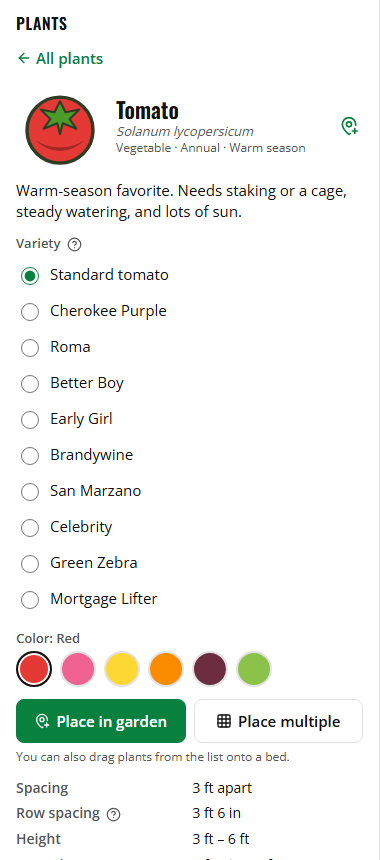
The new plant is selected, so you can drag it into place. To place another, tap Place in garden again. Changed your mind before tapping the bed? Open a different plant (or pick another variety or color) and you'll place that one instead, or tap ✕ (or press Esc) to stop.
On a computer you can also drag a plant from the list straight onto a bed.
Spacing circles
Each plant sits in a light circle as wide as its recommended spacing, so you can see the room it needs. Where circles overlap, plants are closer than recommended, and they're marked with a warning (see Warnings).
To change one plant's spacing, select it and change Spacing in its details. Use recommended puts it back.
Rows and blocks: Place multiple
To plant a row or a block at once, tap Place multiple in the plant's details.
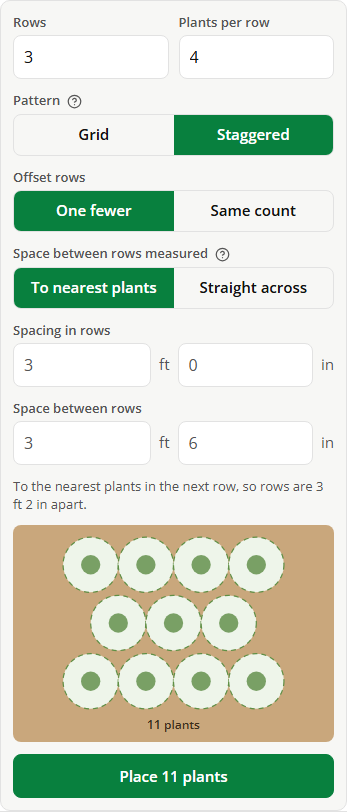
- Set Rows and Plants per row (up to 100 each).
- Pick a Pattern:
- Grid: plants lined up in rows and columns.
- Staggered: every other row shifted by half the spacing, so plants sit in the gaps of the next row. Choose whether offset rows have One fewer plant or the Same count, and which way they Stagger.
- Check Spacing in rows and Space between rows. They start at the plant's recommended spacing and row spacing (for example, tomatoes 3 ft apart in rows 3½ ft apart).
- The Preview shows what you'll get. Tap Place 12 plants (it shows your count), then tap a bed.
For staggered rows, Space between rows measured decides how the row distance is taken: To nearest plants (the plants in the next row; the rows end up a little closer, and the menu says how far) or Straight across from row to row.
If part of the group hangs off the bed, it's still placed. Drag it to fit.
Groups
Plants placed together stay a group:
- Tap a plant in the group to select the whole group, and drag to move it all.
- Tap a plant in the selected group to select just that plant, and move it on its own. The group keeps its new shape.
- The group's details have its rows, plants per row and rotation. Changing rows or plants per row lays the group out again. Drag the round handle to turn the rows.
- Ungroup splits it into separate plants.
- To make a group from plants you placed one by one, select them all and tap Group. They need to be the same plant and variety (colors can differ).
When the plants in a group are close together on screen (rows of beans, or when zoomed out), the group shows as one patch with a single picture and a count, like "Bush Bean × 60".
Row spacing
Some plants need more room between rows than between plants in a row. When you select one, its row spacing shows softly around it: a circle around a single plant, or an oval along its rows.
Selecting, copying and deleting
- Several plants: on a computer, hold Shift and click, or drag a box. On a phone, long-press a plant, then tap others. Or use Select multiple in the toolbar.
- Nudge: the arrow keys move selected plants 1 inch (1 cm in meters), or a whole grid square with Shift. Square-foot tiles move a square at a time.
- Duplicate (or Ctrl+D) copies the selection.
- Delete (or Delete), or drag plants off the garden onto the plant list.
Plants outside beds
Plants belong in beds, but you can put them anywhere, for example a tree in the yard. A plant that isn't in a bed is outlined in red with a crossed-out bed badge. That's just a reminder; it's fine to leave it.
Tip: Turn on Show plant names in Settings to label every plant.
